Your phone is with you 24/7—so why not make it as fabulous as you are?
This DIY rhinestone phone case project is the perfect way to express your style, stand out in a crowd, and keep your tech looking extra glam. Whether you love sleek sparkle, rainbow bling, or full-on crystal chaos, we’ll walk you through exactly how to do it yourself (and do it right).
Perfect for: selfies, gifts, custom orders, or just because your phone deserves to be the main character.
Why You’ll Love This Project
- Totally custom to your style and vibe
- Instagram-worthy — your mirror selfies just got an upgrade
- Makes a one-of-a-kind gift (hello, birthdays and besties!)
- Works on nearly any phone case — clear, black, silicone, or hard shell
- Way cheaper than designer cases, but just as glam
What You’ll Need
You can either gather supplies yourself or make it super easy with our all-in-one Rhinestone Phone Case Kit — it has everything you need in one sparkly box.
Supply List:
- A phone case (plain is best — clear, silicone, or hard plastic)
- Flat-back rhinestones (assorted sizes or one uniform size)
- Strong adhesive (E6000, Gem-Tac, or resin glue for best hold)
- Tweezers or wax pencil for precision
- Toothpicks or glue applicator
- Cotton swabs for cleanup
- Optional: UV light if using resin-based glue
Blinggrl Tip: Clear phone cases are great because you can add a background or photo under your design for a double layer of cuteness.
Step 1: Design Your Layout
Before you start gluing, sketch out your design or play around with your rhinestones on the case to visualize the layout.

Design Inspo:
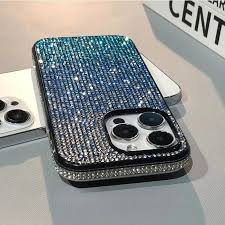
- Full bling: Cover the whole back in rhinestones for max sparkle
- Heart / Butterfly / Stars: Lay out a shape or symbol using stones
- Name or initials: Personalize it with lettering
- Accent corners: Add clusters to just one or two corners
- Ombre effect: Use different stone sizes or colors fading from one side
Pro Tip: Use a printed template under a clear case as a guide while placing your stones.
Step 2: Prep Your Case
Clean the phone case thoroughly with rubbing alcohol or soap and water. Dry it completely. This removes any oils or dust that could prevent the rhinestones from sticking.
If you’re using a shiny plastic case, a quick buff with sandpaper can help the glue adhere better.
Step 3: Start Gluing
Work in small sections (1–2 inches at a time). Apply a thin layer of glue either directly to the case or to each rhinestone. Use tweezers or a wax pencil to pick up and place each stone.
Take your time:
- Too much glue = mess
- Too little glue = weak hold
- Wipe excess glue immediately with a cotton swab
Want extra sparkle? Layer different sizes or iridescent stones for depth.
Step 4: Build and Layer
Continue placing rhinestones row by row or by section, depending on your design. If you’re layering or doing full coverage, mix large and small stones for a more filled-in look with fewer gaps.
For letters or shapes, lay out the outline with tiny stones first, then fill in the center.
Let each section dry for a few minutes before moving on to avoid shifting or smudging.
Step 5: Let It Cure
Once your design is complete, let the case dry completely—at least 24 hours for most glues. For resin or UV glues, follow the brand’s directions or use a UV lamp for a quicker cure.
When fully cured, gently flex the case to ensure all stones are secure. If any pop off, reapply glue and press back in place.
Avoid putting your phone in the case until it’s fully dry to prevent pressure marks or glue transfer.
Optional: Add a Personal Touch
Want to make it extra?
- Add tiny charms or decals between rhinestones
- Include a mirror or pop socket in the design
- Use metallic paint pens to draw outlines before stoning
- Add glow-in-the-dark stones or gems that shift color
Bonus: DIY Phone Case Party
This makes the perfect girls’ night or birthday party activity. Just set up a bling bar with rhinestones, glue, and plain cases, and let everyone design their own.
Make it extra fun with music, snacks, and selfie stations for everyone to show off their cases!
Ready to Get Started?
Don’t waste time chasing down supplies—grab one of our best-selling Phone Case Kits and start blinging today!
Each kit includes:
- A plain phone case (choose your model)
- Rhinestones in coordinated colors
- Precision glue + applicator
- Tweezers or wax tool
- Layout tips and inspo guide