Hey sparkle squad!
Welcome back to Blinggrl.com — your glitter-dusted corner of the internet where ordinary becomes extraordinary. If you’re the kind of glam queen (or king!) who believes a little sparkle can fix just about anything, you’re going to love what we’ve got lined up. Today, we’re diving into the world of DIY rhinestone home décor — and trust us, your home is about to glow like it’s ready for its close-up on a fabulous HGTV-meets-MTV-Cribs crossover episode.
Whether you’re refreshing your space for a new season, jazzing up a few thrift store finds, or simply can’t resist the glimmer of a rhinestone, these projects are here to turn your home into a glittering glam palace.
So grab your glue gun, pop on your favorite playlist, and let’s make magic.

Rhinestones and the crafts for a DIY home decor Session
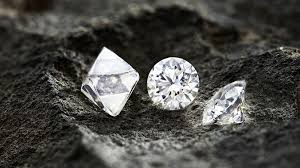
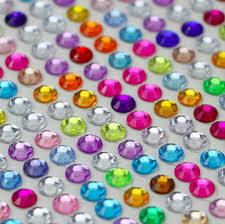
Rhinestones are versatile and come in a wide variety of shapes, sizes, and colors. Whether you’re looking for something subtle and sleek or bold and glamorous, rhinestones can be the perfect addition to your DIY projects. Here’s why rhinestones should be your go-to craft material for home decor:
1. Endless Variety
Rhinestones are available in countless colors, sizes, and finishes, making it easy to match them with any style or color palette. Whether your home features bold, vibrant hues, neutral tones, or a minimalist monochrome aesthetic, rhinestones can seamlessly blend in or stand out, depending on the effect you’re going for. You can even choose from matte, glittery, or faceted rhinestones to create a texture or shimmer that fits your space. From iridescent blues to classic crystal clear options, the possibilities are endless!
2. Easy to Use
One of the main reasons rhinestones are loved by DIY crafters is how easy they are to work with. Whether you’re a beginner or a seasoned pro, rhinestones don’t require complicated tools or special skills to apply. Most rhinestones come with a peel-and-stick backing, or you can use a hot glue gun to attach them to your projects. Their simple application allows you to quickly transform everyday items, such as vases, picture frames, or even furniture, into dazzling, personalized pieces of art.

3. Customizable
The beauty of working with rhinestones lies in their ability to create fully customizable designs. You can arrange rhinestones in any pattern that suits your style—whether that’s a neat grid or a free-flowing design. Experiment with geometric shapes, floral patterns, or abstract art to give your decor a unique touch. With rhinestones, no two projects need to look alike, meaning your home can feature one-of-a-kind pieces that reflect your personality and creative flair.
4. Affordable Glamour
While rhinestones offer a glamorous, high-end look, they are incredibly affordable compared to other luxury home decor materials. A small budget can go a long way, allowing you to embellish multiple items and create a cohesive look throughout your home without breaking the bank. Whether you’re updating an old picture frame or creating an entirely new statement piece, rhinestones provide a cost-effective way to add sparkle and sophistication to any room.
5. Durability and Long-Lasting Shine
Rhinestones are not only beautiful but also durable. They maintain their shine and luster over time, meaning your decor will continue to sparkle long after you’ve completed your project. Unlike glitter or other temporary materials, rhinestones are designed to stay in place, making them perfect for creating decor that you want to last for years.
6. A Quick, Instant Makeover
Rhinestones are perfect for quick and easy DIY projects. If you’re looking for a fast way to refresh or personalize your home decor, rhinestones can work wonders. A simple rhinestone embellishment on a vase, lamp shade, or mirror can completely change the look of a room with minimal effort, giving you an instant, high-impact makeover.
Looking for the best rhinestones for your DIY project? Check out our collection of premium rhinestones here at Blinggrl!
How to Decorate a Picture Frame with Rhinestones
A rhinestone-studded picture frame can transform a simple photo into an elegant and eye-catching piece of art. Whether you’re looking to add a touch of sparkle to a cherished memory or elevate a modern gallery wall, a rhinestone frame can give your home decor a sophisticated upgrade. Here’s a simple step-by-step guide to get started:
1. Choose Your Frame
Start by selecting a picture frame that fits the style and vibe of your space. A sleek, metallic frame with silver or gold accents works beautifully for modern or contemporary interiors. For a more vintage or rustic look, opt for a wooden frame that can add a natural, earthy touch to the rhinestones. The frame color and material should complement the rhinestones, so consider whether you want the frame to blend in or make a statement.
Pro Tip: If you prefer a more minimalistic look, consider using a neutral-colored frame (white, black, or gray) to allow the rhinestones to take center stage.
2. Gather Your Supplies
To make your rhinestone-studded picture frame, you’ll need a few essential supplies:
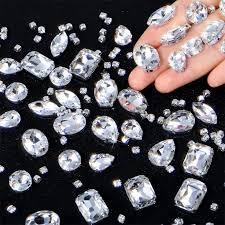
- Rhinestones: Choose a color and size that matches your style and room decor. You can go for a monochromatic look or mix different colors for a playful effect.
- Strong Glue: E6000 or a similar craft adhesive works well to secure the rhinestones in place. This type of glue is durable and dries clear, making it perfect for intricate projects like this.
- Tweezers: These will help you pick up and place each rhinestone with precision, ensuring a clean and organized design.
- Clean Cloth: Wipe down your frame before starting to make sure there’s no dust or residue that could interfere with the glue.
3. Design Your Frame
Now comes the fun part – creating your design! Start by gluing rhinestones along the edges of the frame. You can opt for a simple border of rhinestones or get creative with patterns and designs.
- For a classic border, apply the rhinestones in a single line around the frame’s edges, making sure the glue is evenly applied to each stone.
- For a random pattern, create an organic look by scattering rhinestones of different sizes and colors across the frame. This approach allows for a more whimsical or personalized design.
- If you’re feeling adventurous, you can also create shapes or symbols (like hearts or stars) inside the frame with the rhinestones, adding a playful touch to your project.
Design Tip: Try to leave space for the photo to shine through, ensuring that the rhinestones enhance the picture without overwhelming it.
4. Let It Dry
After you’ve arranged all your rhinestones, it’s crucial to let the glue dry completely before handling your frame. The drying process typically takes 24 hours to ensure that the rhinestones are securely affixed and that the glue has fully set. Be patient and resist the urge to rush – this will ensure a long-lasting result that won’t easily come undone.
Tip: Place your frame in a safe spot where it won’t be disturbed while drying to prevent any accidental shifting of the rhinestones.
5. Add Your Photo
Once the rhinestones are securely glued and the frame is dry, you can add your favorite photo! Whether it’s a family portrait, vacation snapshot, or a piece of artwork, your rhinestone frame will make the photo stand out even more.
Final Touch: If you want to take your frame to the next level, consider adding a few rhinestones to the corners or along the inner edge where the glass and photo meet. This will help balance the design and add extra shine to the whole piece.
6. Display Your Frame
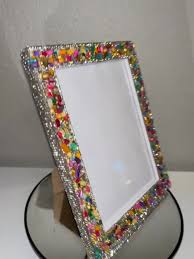
Now that your rhinestone picture frame is complete, it’s time to showcase it in your home! Place it on a mantel, bookshelf, or even use it as a centerpiece for your coffee table. The added sparkle will catch the light, making it a stunning focal point wherever you decide to display it.
By following these steps, you can create a unique, personalized picture frame that will add glamour and elegance to any space. Whether it’s a gift for a loved one or a special addition to your own home, rhinestones frames are a beautiful way to bring a little extra bling into your life.
: For a luxurious touch, try using gold or crystal rhinestones for a glam finish.
Need rhinestones for your project? Shop our Picture Frame Rhinestone Kits now!
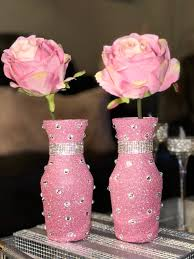
2. Rhinestone Vases: From Basic to Bought
Why it’s fabulous: Transform plain dollar store vases into centerpiece stunners that scream luxury. Whether for flowers, makeup brushes, or just to sit and look pretty, these vases will make your shelfie game strong.
- Glass vases (cylinder, square, bud — your call!)
- Self-adhesive rhinestone trim
- Scissors
- Ruler or measuring tape
How to Make It Sparkle:
- Measure the circumference of the vase and cut your rhinestone trim to fit.
- Peel the backing and stick the trim around the vase, making sure it’s straight.
- Layer multiple rows for extra glam or create a chic striped effect.
- Optional: Seal with a clear-drying adhesive for extra hold.
Blinggrl Tip: Pop in some faux flowers, a battery-powered tealight, or a makeup brush set for a functional display that sparkles.
3. Glam Phone Case: DIY Your Daily Bling
Why it’s fabulous: Your phone is basically an extension of you — and it deserves to match your energy! A DIY rhinestone phone case adds glam with a personal twist.
- A clear or plain phone case
- Assorted flatback rhinestones
- Strong E6000 craft glue
- Cotton swabs, toothpicks, and rubbing alcohol
How to Make It Sparkle:
- Clean the case with rubbing alcohol for max adhesion.
- Sketch out a pattern or go freestyle — stars, hearts, initials, or full-on glam chaos!
- Dab glue in small sections, place rhinestones using tweezers.
- Let dry 24 hours before snapping it on your phone.
Blinggrl Tip: Mix in pearls, studs, or tiny charms for a look that’s totally YOU. And don’t forget to tag us when you post your masterpiece!
4. DIY Rhinestone Wall Art: Statement Sparkle for Your Walls
Why it’s fabulous: Turn any wall into a runway with art that literally shines. Whether you love modern glam, boho-chic sparkle, or celestial queen energy, there’s a rhinestone wall art project for you.
- Blank canvas (any size — bigger is bolder!)
- Acrylic paint in your fave colors
- Flatback rhinestones
- Paintbrushes and glue
- Pencil and stencil (optional)
How to Make It Sparkle:
- Paint your canvas background and let dry.
- Lightly sketch your design — hearts, stars, quotes, or abstract lines.
- Apply glue to your design area and press rhinestones into place.
- Use larger stones for emphasis and smaller ones for detailed sparkle.
Blinggrl Tip: Outline your favorite quote in rhinestones — something empowering like “Shine On” or “Too Glam to Give a Damn.” Instant mood booster!
Bonus Round: Extra-Sparkly Ideas
Feeling extra crafty? These bonus ideas will take your home decor from “ooh” to “OMG WHERE DID YOU GET THAT?!”
- Light switch covers: Add rhinestones around the edge for a tiny but impactful sparkle moment every time you flip the lights.
- Mirror frames: Give that vanity mirror a Hollywood glam upgrade.
- Candle holders: Perfect for dinner parties, bathroom vibes, or bedside sparkle.
- Coasters: Because even your drinks deserve a touch of luxury.
Final Tips from the Blinggrl Squad
- Sealing: For items that get lots of handling, consider sealing your rhinestones with a clear craft sealant to keep them in place longer.
- Color combos: Don’t be afraid to mix bold and subtle shades — rose gold + champagne is a Blinggrl fave.
- Cleanup: Keep rubbing alcohol nearby for cleaning glue smudges as you go.
And remember: There’s no such thing as too much sparkle. Own your shine!
Ready to Get Your Bling On?
We’d love to see how YOU glam up your home with rhinestones! Snap a pic of your creations and tag @blinggrlcrafts on Instagram or TikTok — you might just be featured in our next Sparkle Spotlight.
And don’t forget to stock up on your supplies here:
Stay sparkly, stay fabulous, and keep shining bright — because at Blinggrl.com, you were born to sparkle.